


Guide to Bike Lights: See and Be Seen!
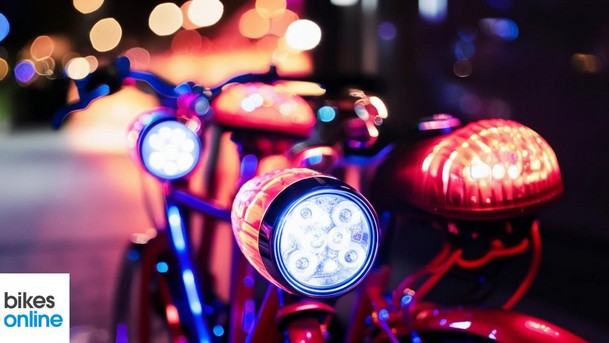
Cycling is not only an eco-friendly way to get around, but it’s also great for your health. However, safety should always come first. One essential accessory for every cyclist is a reliable set of bike lights. Bike lights are crucial because they help you see the path ahead and ensure you’re visible to other road users. If you're unsure about which lights to choose or how to use them effectively, this guide has got you covered.
Why You Need Bike Lights

Bike lights serve two main purposes: enabling you to see your route clearly and making sure others can see you. A good set of lights improves visibility, thereby reducing the risk of accidents. This is particularly important in low-light conditions such as dawn, dusk, or night.
Additionally, certain regions legally require cyclists to have both front and rear lights. Being equipped with the right lights not only keeps you safe but also ensures compliance with traffic laws.
The Necessity for Nighttime Rides
Riding at night brings its own set of challenges. Roads may be less visible due to inadequate street lighting. In these situations, having high-quality bike lights becomes paramount. They illuminate your path and warn other vehicles of your presence.
Many accidents occur due to poor visibility. Bright, well-positioned lights play a significant role in preventing these incidents by providing sufficient illumination and catching the attention of drivers.
Daytime Visibility
Even during the day, bike lights can greatly enhance your visibility. Especially in adverse weather conditions like fog or heavy rain, strong lights ensure that you're seen from a distance. Using bike lights during the day might seem unnecessary to some, but it's a simple step toward enhancing safety.
Ensuring you're easily seen, regardless of the time of day, can make a big difference in avoiding potential crashes. Front and rear lights increase your visibility from all angles.
Types of Bike Lights
There are various types of bike lights available on the market. Each type serves a specific purpose and caters to different riding needs. Understanding these can help you make an informed choice based on your cycling habits.
Front Lights
Front lights are primarily designed to light up your path. These lights are usually stronger in terms of brightness measured in lumens. Lumens are units that measure the total quantity of visible light emitted by a source.
Higher lumen counts mean brighter lights. For instance, a light with 1000 lumens will be much brighter than one with 200 lumens. Choosing front lights depends on whether you ride mainly in urban areas with streetlights or in darker, rural settings.
Rear Lights
Rear lights are critical for ensuring you're seen from behind. Unlike front lights, rear lights focus more on being conspicuous rather than illuminating the road. These lights often come in red and offer various flashing modes for increased visibility.
A good rear light makes you noticeable to any vehicle approaching from behind, especially when combined with reflective gear. Rear lights commonly range between 20 and 100 lumens.
Helmet Lights
Helmet lights provide added flexibility as they move where your head turns. This feature is particularly beneficial for mountain biking or trail riding where you need extra directional light. Many helmet lights are compact and lightweight to avoid discomfort.
When using helmet lights, consider combining them with handlebar-mounted lights for the best effect. Having both sets increases overall visibility and illuminates different parts of your surroundings.
Side Visibility Lights
These lights are designed to improve your visibility from the sides. Most bike accidents happen at intersections where side visibility is crucial. Side visibility lights can be mounted on spokes or frames and emit bright, often colored, light signals.
Increasing your side visibility drastically reduces the chance of getting hit by cross-traffic. It's another layer of protection for urban commutes where intersections are frequent.
Key Features to Consider
Choosing the right bike lights involves understanding several key features. Here are some factors to keep in mind while shopping for lights to see and be seen.
Brightness and Lumens
The brightness of bike lights is measured in lumens. Depending on where you ride, you may want different levels of brightness. Urban riders might need fewer lumens compared to those cycling in unlit areas.
-
For city commutes: 100 to 300 lumens
-
For dark trails or rural roads: 500+ lumens
Finding the right balance ensures adequate illumination without blinding others.
Battery Life
Battery life varies significantly between models. If you frequently undertake long rides, opt for lights with extended battery life or USB rechargeable options. Lights with replaceable batteries are also convenient for unexpected power loss.
Some lights offer indicators that signal when the battery is running low, so you won't be caught off guard during a ride. Prioritizing battery life ensures consistent performance.
Mounting Position
Proper mounting positions for lights include handlebars, seat posts, and helmets. Ensure that the lights can be securely attached and easily adjusted to suit your preference. Effective mounting positions maximize their functionality.
Consider the simplicity of detaching your lights when parking your bike. Quick-release mounts are particularly helpful for commuters who leave their bikes unattended often.
Waterproof Rating
Your bike lights should handle various weather conditions. High waterproof ratings denote better protection against rain or puddles. Look for ratings like IPX4 or higher for dependable water resistance.
Waterproof lights guarantee durability, allowing you to ride confidently regardless of weather. This feature is especially crucial for avid cyclists who bike year-round.
Light Settings
Modern bike lights come with multiple settings such as steady, flashing, or pulsing modes. These settings are useful for different environments and times of the day. Flashing modes generally consume less battery while increasing your visibility to others.
Experiment with different settings to find what works best for your needs. Versatile light settings offer greater control over your visibility and safety.
Installing and Maintaining Your Bike Lights
Once you've selected your lights, knowing how to properly install and maintain them is equally important. Correct installation ensures optimal performance and longevity.
How to Mount Your Lights
Begin by reading the manufacturer’s instructions carefully. For front lights, attach them securely to your handlebars, ensuring they point straight ahead without tilting too high or low. Rear lights typically go on the seat post, angled slightly downward to avoid glare for vehicles behind you.
If using helmet lights, strap them snugly to minimize movement. Always double-check that all lights are tightly fastened before starting your ride. Loose lights can be hazardous and ineffective.
Regular Maintenance Tips
Maintain your lights by cleaning them regularly. Dirt and moisture can reduce their effectiveness over time. Use a damp cloth to wipe down the lenses and body, ensuring there’s no debris obstructing the light beam.
Check batteries periodically, replacing or recharging them as needed. For USB rechargeable models, make sure to use the specified cables and avoid overcharging. Keeping spare batteries handy can be a lifesaver on long trips.